With New Blogger 2006, Blogger added another layer of simplicity in web site development. They redesigned their templates, using Dynamic HTML, and XML, for more flexibility and options. And they added two key improvements.
The Page Elements wizard lets you add and re locate objects on the blog page, and maintains the blog template.
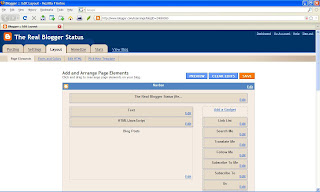
This is Page Elements, in the Classic GUI.

This is the Layout page, 2016.

This is more of the Layout page, 2016.
The Page Elements wizard is reached from the Design link in the dashboard or navbar (when you use the Classic GUI) - or from the Layout menu entry (when you use the New GUI (2011)). If the blog is setup to use a dynamic template, "Page Elements" won't apply - and "Layout" won't even be part of the New GUI menu.
The Blog Posts widget, which is the largest individual object in the "Layout" / "Page Elements" display, lets you re arrange objects in the posts, and maintains the post template.
Blogger provides various commonly used blog accessories, that you can add as a simple page element, using the GUI page element editor. No more editing the template HTML code, to add popular page accessories.
Adding any of the above accessories is simple.
Compared to Old Blogger and the monolithic choice of the Classic template, probably 90% of the needs to customise the template code will be taken care of by the Page Elements GUI, and its peer the Fonts and Colors GUI. For another 9%, there's the HTML / JavaScript gadget.
Note that you may not always be able to add a new page element, or position it into a given section of the template, without occasionally making some changes to various settings in the template.
For the most part, though, you can now forget about editing the blog template to add a popular accessory. Just use the Page Elements GUI.
Now, admire your new improvement.
Removing gadgets is simpler, still.
- Template objects (aka "Page Elements", which are now called "gadgets").
- A GUI Page Elements editor, to setup, position, and maintain the template objects.
The Page Elements wizard lets you add and re locate objects on the blog page, and maintains the blog template.

This is Page Elements, in the Classic GUI.

This is the Layout page, 2016.

This is more of the Layout page, 2016.
The Page Elements wizard is reached from the Design link in the dashboard or navbar (when you use the Classic GUI) - or from the Layout menu entry (when you use the New GUI (2011)). If the blog is setup to use a dynamic template, "Page Elements" won't apply - and "Layout" won't even be part of the New GUI menu.
The Blog Posts widget, which is the largest individual object in the "Layout" / "Page Elements" display, lets you re arrange objects in the posts, and maintains the post template.
Blogger provides various commonly used blog accessories, that you can add as a simple page element, using the GUI page element editor. No more editing the template HTML code, to add popular page accessories.
- AdSense. Add an AdSense ad to your blog.
- Archive. Display an index of the posts in the blog.
- BlogList. Combining a linklist with a blog feed gadget, a bloglist shows the most recent post from any set of blogs that interest you.
- Contributors / Profile. Display information about yourself, or about the authors of your blog.
- Feed. Add content from an RSS or Atom feed to your blog.
- A feed from your blog.
- A blog comments feed.
- A blog posts feed.
- A blog label feed.
- A similar feed from any other blog.
- Any feed from any other web site.
- A feed from your blog.
- Followers. The Blogger merging of Blogger profiles, feeds, and focused "Next Blog" type surfing.
- HTML/JavaScript. Add HTML / JavaScript code to your blog.
- Labels. List the labels in the posts in your blog.
- List. Make a list of your favourites.
- Link List. Make a list of your favourites, linked to other posts, blogs, or web sites.
- Logo. Add a Blogger logo to your blog.
- Newsreel. Add current headlines from Google News to your blog.
- Page Header. Display your blog's title and description.
- Picture. Add a picture from your computer or from somewhere else on the web.
- Poll. Survey your visitors.
- Text (aka "Welcome Post"). Add some words to your blog - using Rich Text.
- Video Bar. Display video clips, from YouTube and Google Video, in your blog.
Adding any of the above accessories is simple.
- Starting from the dashboard, select "Design" / "Layout". Or, select "Design" on the navbar.
- This puts you on "Page Elements" / "Layout".
- Select "Add a Gadget".
- You'll get a pop-up window "Add a Gadget", with all of the above choices presented to you.
- Pick any one, for the appropriate wizard.
Compared to Old Blogger and the monolithic choice of the Classic template, probably 90% of the needs to customise the template code will be taken care of by the Page Elements GUI, and its peer the Fonts and Colors GUI. For another 9%, there's the HTML / JavaScript gadget.
Note that you may not always be able to add a new page element, or position it into a given section of the template, without occasionally making some changes to various settings in the template.
For the most part, though, you can now forget about editing the blog template to add a popular accessory. Just use the Page Elements GUI.
- Select "Add a Gadget".
- Select the gadget of your choice from the list.
- Add some content, or select details, as necessary.
- Hit "OK".
- Re position your new gadget on the page, as necessary.
- Hit "Save".
- You're done.
Now, admire your new improvement.
Removing gadgets is simpler, still.
- Identify the gadget to be removed.
- Hit the "Edit" link, for the gadget in question.
- Hit the "Remove" button.
- Hit "Yes".
- You're done.
Comments