A few folks have asked me about my social media toolbar, that I added a couple months ago.
It took very little work, to develop and install this gadget.
I just went to the AddThis website, registered, selected the options, and got the code. Then, I added one more HTML gadget, to my blogs.
Adding an AddThis social media toolbar takes very little work - if the blog does not use a dynamic template.
You could do the whole job in 15 minutes - though you'll probably spend a couple hours choosing and tweaking the options. And in my blog, writing and updating this post.
Start by registering with AddThis, and configuring a gadget in their library.
You register with their service, select a toolbar from their library, select the right options, and get the code. They have a large library of useful gadgets - for the time being I settled for the one free gadget.
The fun part was choosing the service buttons. They have a huge library of buttons, for every major publishing and social media service on the Internet. You'll see an assortment of the most popular services - and if you click on "Load More" for the full library.
 This is the library of buttons, that I see when tweaking my toolbar. What you see may or may not differ.
If you have multiple blogs, you can setup one toolbar and use it on all of your blog(s) - or you can have different toolbars, for different blogs.
Select any useful number of services, to provide in your toolbar.
You just select the toolbar buttons that interest you, arrange them into the right sequence (alphabetically, for my tastes), and save. Then, get the code generated by the wizard.
You can't select all of the services offered - look at the menu, in AddThis (200 choices, as of September 2017). But if you know who your readers are - and what services they may use, you can select a representative set of social media services.
Take the code provided, add an HTML gadget to your blog, and paste the code.
Add one more HTML gadget, using "Add a Gadget". Paste the code, into the new gadget. Save, and Done.
 See the share bar, in the left margin? Scroll the display, and watch how it floats there.
The AddThis toolbar floats, just like my "To The Top" button. I just added a new HTML gadget, positioned the gadget in a slot in the footer for convenience, refreshed my browser, and there was my new accessory.
This blog uses the Notable responsive template with the pop out sidebar. The footer is the right place for the HTML gadget - to make the toolbar active, even with the sidebar hidden. The gadget is invisible - so you can position it, where you like.
This complements my floating "Subscribe by email" button, in the right margin.
Use the AddThis dashboard, to setup your toolbar.

1. Click "Tools", in the AddThis navbar.
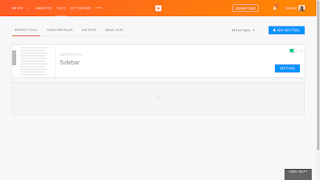
2. Click the "Add New Tool" button, on the Tools page, to create your toolbar. Click the "Settings" button, for the toolbar already setup, if you're adding a service to an existing toolbar.

3. Click the "Share Buttons" icon, for the free toolbar.

4. Here's the AddThis toolbar setup wizard. It's intuitive, like many Blogger wizards. Add services, and re sequence the buttons, as you need.

5. Go back to the AddThis dashboard, and click "Get The Code" in the navbar.

6. And there is the code, for your toolbar.
Copy the code, from "First copy the following code.". Paste into your new HTML / JavaScript gadget, in your blog(s).
Any time you need to add a service, just use the toolbar setup wizard - and add the buttons that interest you.
Yes, it's that simple.
It took very little work, to develop and install this gadget.
I just went to the AddThis website, registered, selected the options, and got the code. Then, I added one more HTML gadget, to my blogs.
Adding an AddThis social media toolbar takes very little work - if the blog does not use a dynamic template.
You could do the whole job in 15 minutes - though you'll probably spend a couple hours choosing and tweaking the options. And in my blog, writing and updating this post.
Start by registering with AddThis, and configuring a gadget in their library.
You register with their service, select a toolbar from their library, select the right options, and get the code. They have a large library of useful gadgets - for the time being I settled for the one free gadget.
The fun part was choosing the service buttons. They have a huge library of buttons, for every major publishing and social media service on the Internet. You'll see an assortment of the most popular services - and if you click on "Load More" for the full library.

If you have multiple blogs, you can setup one toolbar and use it on all of your blog(s) - or you can have different toolbars, for different blogs.
Select any useful number of services, to provide in your toolbar.
You just select the toolbar buttons that interest you, arrange them into the right sequence (alphabetically, for my tastes), and save. Then, get the code generated by the wizard.
You can't select all of the services offered - look at the menu, in AddThis (200 choices, as of September 2017). But if you know who your readers are - and what services they may use, you can select a representative set of social media services.
Take the code provided, add an HTML gadget to your blog, and paste the code.
Add one more HTML gadget, using "Add a Gadget". Paste the code, into the new gadget. Save, and Done.

The AddThis toolbar floats, just like my "To The Top" button. I just added a new HTML gadget, positioned the gadget in a slot in the footer for convenience, refreshed my browser, and there was my new accessory.
This blog uses the Notable responsive template with the pop out sidebar. The footer is the right place for the HTML gadget - to make the toolbar active, even with the sidebar hidden. The gadget is invisible - so you can position it, where you like.
This complements my floating "Subscribe by email" button, in the right margin.
Use the AddThis dashboard, to setup your toolbar.

1. Click "Tools", in the AddThis navbar.

2. Click the "Add New Tool" button, on the Tools page, to create your toolbar. Click the "Settings" button, for the toolbar already setup, if you're adding a service to an existing toolbar.

3. Click the "Share Buttons" icon, for the free toolbar.

4. Here's the AddThis toolbar setup wizard. It's intuitive, like many Blogger wizards. Add services, and re sequence the buttons, as you need.

5. Go back to the AddThis dashboard, and click "Get The Code" in the navbar.

6. And there is the code, for your toolbar.
Copy the code, from "First copy the following code.". Paste into your new HTML / JavaScript gadget, in your blog(s).
Any time you need to add a service, just use the toolbar setup wizard - and add the buttons that interest you.
Yes, it's that simple.
Comments