One of the biggest strengths of Blogger custom domain publishing is its ability to work with (almost) any registrar in the world.
The biggest strength is also its biggest weakness. The weakness involves language and syntax, as used by each different registrar.
There are no absolute terms used, when diagnosing DNS addressing problems. That is one of the challenges, that I face daily, when telling people why their domains do not work.
When you setup your domain, you use the zone editor to add the needed DNS addresses.
The "zone editor" is the DNS dashboard, that's provided by the registrar. Each registrar has their own zone editor - and each zone editor will work differently. That's one of the challenges.
Access to the zone editor, for your domain, is your responsibility.
If your domain has a problem, and the diagnosis of the problem involves DNS addressing changes, you will need access to the zone editor.
The people in the forums, and using various other online services, will patiently walk you through the task of correcting any DNS addressing mistakes - but any corrections will require zone editor access, by you.
You are the owner of the domain - and it's up to you, to get instructions from your registrar.
This part is your responsibility, nobody can do this for you. Just as we advise people to never share their Blogger account, we similarly advise you to never share your domain owner account.
We'll use my domain as an example, in this discussion.
Let's look at my domain, and how it's setup. Your domain, no matter what registrar you use, will require similar setup. You'll benefit more from this example, if you understand how to read a Dig log.
A Google Domains hosted domain, for those blog owners able to use Google Domains, will have a different menu / zone editor - but the end results will be similar.
The base DNS addresses needed.
Here is the DNS address set, for my domain "nitecruzr.co.uk", presented as a Dig log extract.
If I am helping you, in the forums, this is what you will see, as a reference. The Dig log extract, for your domain, will probably be accompanied by a link to this article.
99.99% of the blog owners, who need help, will be using an asymmetrical DNS configuration. There are two additional address models, which are supported - though seldom in use when help is requested.
A Dig log extract is a versatile way of displaying DNS addresses - either to show what is needed, or what is currently in effect. It is the most universally seen display - and is independent of formatting and syntax oddities, which are part of every registrar zone editor.
You can compare the Dig log extract (above), to the full Dig log, and to the zone editor display (both below).
A Dig log, showing the base DNS addresses.
Here is a Dig log for my domain "nitecruzr.co.uk".
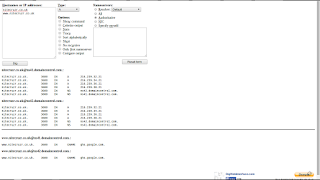
A Dig log, provided by DigWebInterface, is one diagnostic reference.
There are dozens of Dig variants. This is the one that I use, whenever it's available.
The Dig URL, for my domain:
Zone editor displays, showing the base DNS addresses.
Here are three zone editor displays, provided by my registrar, right now, for "nitecruzr.co.uk".
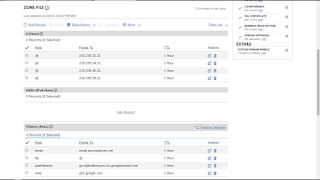
The zone editor display.
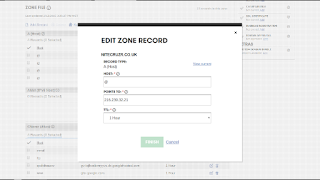
The entry panel for one domain root host.
See "Host", and "Points to"?
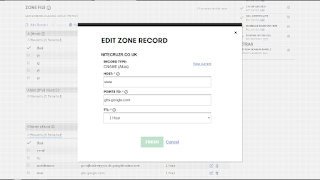
The entry panel for the "www" host.
See "Host", and "Points to"?
Compare this entry with the "qxdktlteaotv" host, below.
Note that here, "Hosts" will (almost) always be "www" - and "Points To" will (always) always be "ghs.google.com". Compare this consistency with "qxdktlteaotv" and "lojlkodbmryyvc" (below).
What comes next?
Having setup the base DNS addresses properly, it's time to publish the blog, to the "www" host. With the asymmetrical DNS configuration, the "www" host is the normal target.
Sometimes, the blog will publish.

Sometimes, immediate success!
If your blog publishes successfully, see "What comes last?".
In many cases, you'll have to add a verification DNS address.

An example of the infamous "Error 12".
You may get an "Error 12" - or a similar error value - if domain ownership verification is necessary.
The verification DNS address needed.
Here's the DNS addresses needed, for my domain, with the ownership verification entry added. Do you see the entries for "www" and "qxdktlteaotv" - and how they complement each other?
Some people may refer to "qxdktlteaotv" as the "short token", and "lojlkodbmryyvc" as the "long token", when discussing ownership verification. "gv-lojlkodbmryyvc.dv.googlehosted.com" then becomes the "long token" URL.
If you need to add the second "CNAME", copy and paste the long and short tokens, with extreme care. Don't trust your eyes - or your fingers. One mistake will prevent verification.
A Dig log, showing the verification DNS address.
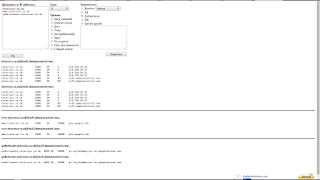
The Dig log.
See the entry for "qxdktlteaotv"?
The Dig URL, for my domain:
Zone editor displays, showing the verification DNS address.
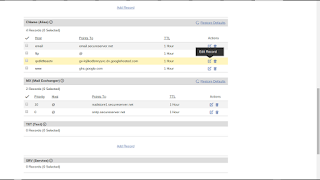
The zone editor display.
See the entry for "qxdktlteaotv"?
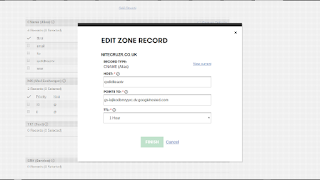
The entry panel for the "qxdktlteaotv" host.
See "Host", and "Points to"?
Compare this entry with the "www" host, above.
Please note that "qxdktlteaotv" and "lojlkodbmryyvc" is merely an example, here. Compare this with "www" and "ghs.google.com" (above).
Your domain will use different "Name, Label, or Host", and "Destination, Target, or Points to" values.
Different zone editors have different peculiarities.
Every different registrar provides their own zone editor - and every different zone editor will have their own syntax, used when entering the "Host" and "Points to" values. You - and only you - have to accept responsibility for dealing with the syntax peculiarities of your registrar.
Please note that not all zone editors will even label "Host" and "Points to", as "Host" and "Points to".
Also, please observe the "TTL" value. For this registrar, TTL is "1 Hour", or "3600 Seconds". TTL is a tuning factor, set by the registrar, to make their name servers (which support your domain) run as smoothly as possible, across the entire world. If your registrar provides a default TTL, I highly recommend that you use that value.
A typical domain ownership verification "Error 12" display.
Look at an example of the notorious "Error 12" display. Note the pair of column caption triplets.
Those captions are not gratuitous or imaginary - each one is used by some registrar, in their zone editor. Your registrar may use one of the three.
It is possible that some unknown registrar may use even another different caption or two. As I said, there are no authoritative terms used.

An example of the infamous "Error 12".
See the captions, heading the columns - "Name, Label, or Host field" and "Destination, Target, or Points To field"?
Here you see an example of the ambiguity - and why custom domain diagnoses, and this article, are so pedantic. I use Dig log syntax, to describe necessary settings. Dig logs are registrar agnostic.
The language and syntax, and the screen prints, used in these examples, may help you - or it may confuse you. If the latter, my apologies. The confusion is part of the challenge. You may need to document your domain, providing similar detail.
Many registrars change their zone editors, periodically. Mine seems to change theirs, at least yearly. You should learn how to use the zone editor - not merely where to click and what to type - if you are going to own and maintain a domain, for any amount of time.
This article provides examples of what you might see.
Start by asking your registrar for their zone editor instructions. If you ask for help later, in Blogger Help Forum: Get Help with an Issue, providing a link to the instructions would be a huge help.
When you buy your domain, you can use the Blogger instructions as a general guide. But get detailed instructions, from the registrar, too.
What comes last?
If you just made address changes based on my advice above, allow for the DNS Latency period. Double the DNS value - and wait for that time period, to give your domain changes a chance to be established worldwide.
If the domain verification DNS address was just added, try to publish the blog to the "www" address. And don't forget to redirect the domain root, to the "www" host!
If the blog is now successfully published to the domain, start migration activity.
If you continue to have a problem, read my troubleshooting guide, Troubleshooting Your Custom Domain Problems.
The biggest strength is also its biggest weakness. The weakness involves language and syntax, as used by each different registrar.
There are no absolute terms used, when diagnosing DNS addressing problems. That is one of the challenges, that I face daily, when telling people why their domains do not work.
When you setup your domain, you use the zone editor to add the needed DNS addresses.
The "zone editor" is the DNS dashboard, that's provided by the registrar. Each registrar has their own zone editor - and each zone editor will work differently. That's one of the challenges.
Access to the zone editor, for your domain, is your responsibility.
If your domain has a problem, and the diagnosis of the problem involves DNS addressing changes, you will need access to the zone editor.
The people in the forums, and using various other online services, will patiently walk you through the task of correcting any DNS addressing mistakes - but any corrections will require zone editor access, by you.
You are the owner of the domain - and it's up to you, to get instructions from your registrar.
- How to access the zone editor.
- How to use the zone editor.
This part is your responsibility, nobody can do this for you. Just as we advise people to never share their Blogger account, we similarly advise you to never share your domain owner account.
We'll use my domain as an example, in this discussion.
Let's look at my domain, and how it's setup. Your domain, no matter what registrar you use, will require similar setup. You'll benefit more from this example, if you understand how to read a Dig log.
A Google Domains hosted domain, for those blog owners able to use Google Domains, will have a different menu / zone editor - but the end results will be similar.
- The base DNS addresses needed.
- A Dig log, showing the base DNS addresses.
- Zone editor displays, showing the base DNS addresses.
- What comes next?
- The verification DNS address needed.
- A Dig log, showing the verification DNS address.
- Zone editor displays, showing the verification DNS address.
- Different zone editors have different peculiarities.
- A typical domain ownership verification "Error 12" display.
- What comes last?
The base DNS addresses needed.
Here is the DNS address set, for my domain "nitecruzr.co.uk", presented as a Dig log extract.
If I am helping you, in the forums, this is what you will see, as a reference. The Dig log extract, for your domain, will probably be accompanied by a link to this article.
nitecruzr.co.uk. 3600 IN A 216.239.32.21
nitecruzr.co.uk. 3600 IN A 216.239.34.21
nitecruzr.co.uk. 3600 IN A 216.239.36.21
nitecruzr.co.uk. 3600 IN A 216.239.38.21
www.nitecruzr.co.uk. 3600 IN CNAME ghs.google.com.
Your domain, whatever the name, will need this same address set, when published in a typical Asymmetrical DNS Configuration. If you are able to setup this configuration in your domain, you will have the beginning of a properly setup domain. 99.99% of the blog owners, who need help, will be using an asymmetrical DNS configuration. There are two additional address models, which are supported - though seldom in use when help is requested.
A Dig log extract is a versatile way of displaying DNS addresses - either to show what is needed, or what is currently in effect. It is the most universally seen display - and is independent of formatting and syntax oddities, which are part of every registrar zone editor.
You can compare the Dig log extract (above), to the full Dig log, and to the zone editor display (both below).
A Dig log, showing the base DNS addresses.
Here is a Dig log for my domain "nitecruzr.co.uk".

A Dig log, provided by DigWebInterface, is one diagnostic reference.
There are dozens of Dig variants. This is the one that I use, whenever it's available.
The Dig URL, for my domain:
http://www.digwebinterface.com/?hostnames=nitecruzr.co.uk%0D%0Awww.nitecruzr.co.uk&type=A&useresolver=8.8.4.4&ns=auth&nameservers=You can make the same for your domain, just substitute YourDomain for nitecruzr.co.uk, twice.
Zone editor displays, showing the base DNS addresses.
Here are three zone editor displays, provided by my registrar, right now, for "nitecruzr.co.uk".

The zone editor display.

The entry panel for one domain root host.
See "Host", and "Points to"?

The entry panel for the "www" host.
See "Host", and "Points to"?
Compare this entry with the "qxdktlteaotv" host, below.
Note that here, "Hosts" will (almost) always be "www" - and "Points To" will (always) always be "ghs.google.com". Compare this consistency with "qxdktlteaotv" and "lojlkodbmryyvc" (below).
What comes next?
Having setup the base DNS addresses properly, it's time to publish the blog, to the "www" host. With the asymmetrical DNS configuration, the "www" host is the normal target.
Sometimes, the blog will publish.

Sometimes, immediate success!
If your blog publishes successfully, see "What comes last?".
In many cases, you'll have to add a verification DNS address.

An example of the infamous "Error 12".
You may get an "Error 12" - or a similar error value - if domain ownership verification is necessary.
The verification DNS address needed.
Here's the DNS addresses needed, for my domain, with the ownership verification entry added. Do you see the entries for "www" and "qxdktlteaotv" - and how they complement each other?
nitecruzr.co.uk. 3600 IN A 216.239.32.21
nitecruzr.co.uk. 3600 IN A 216.239.34.21
nitecruzr.co.uk. 3600 IN A 216.239.36.21
nitecruzr.co.uk. 3600 IN A 216.239.38.21
www.nitecruzr.co.uk. 3600 IN CNAME ghs.google.com.
qxdktlteaotv.nitecruzr.co.uk. 3600 IN CNAME gv-lojlkodbmryyvc.dv.googlehosted.com.
Some people may refer to "qxdktlteaotv" as the "short token", and "lojlkodbmryyvc" as the "long token", when discussing ownership verification. "gv-lojlkodbmryyvc.dv.googlehosted.com" then becomes the "long token" URL.
If you need to add the second "CNAME", copy and paste the long and short tokens, with extreme care. Don't trust your eyes - or your fingers. One mistake will prevent verification.
A Dig log, showing the verification DNS address.

The Dig log.
See the entry for "qxdktlteaotv"?
The Dig URL, for my domain:
http://www.digwebinterface.com/?hostnames=nitecruzr.co.uk%0D%0Awww.nitecruzr.co.uk%0D%0Aqxdktlteaotv.nitecruzr.co.uk&type=A&useresolver=8.8.4.4&ns=auth&nameservers=You can make the same for your blog, just substitute YourDomain for nitecruzr.co.uk, thrice - if you get the short token for your domain, correctly inserted.
Zone editor displays, showing the verification DNS address.

The zone editor display.
See the entry for "qxdktlteaotv"?

The entry panel for the "qxdktlteaotv" host.
See "Host", and "Points to"?
Compare this entry with the "www" host, above.
Please note that "qxdktlteaotv" and "lojlkodbmryyvc" is merely an example, here. Compare this with "www" and "ghs.google.com" (above).
Your domain will use different "Name, Label, or Host", and "Destination, Target, or Points to" values.
Different zone editors have different peculiarities.
Every different registrar provides their own zone editor - and every different zone editor will have their own syntax, used when entering the "Host" and "Points to" values. You - and only you - have to accept responsibility for dealing with the syntax peculiarities of your registrar.
Please note that not all zone editors will even label "Host" and "Points to", as "Host" and "Points to".
Also, please observe the "TTL" value. For this registrar, TTL is "1 Hour", or "3600 Seconds". TTL is a tuning factor, set by the registrar, to make their name servers (which support your domain) run as smoothly as possible, across the entire world. If your registrar provides a default TTL, I highly recommend that you use that value.
A typical domain ownership verification "Error 12" display.
Look at an example of the notorious "Error 12" display. Note the pair of column caption triplets.
- Name, Label, or Host field
- Destination, Target, or Points To field
Those captions are not gratuitous or imaginary - each one is used by some registrar, in their zone editor. Your registrar may use one of the three.
It is possible that some unknown registrar may use even another different caption or two. As I said, there are no authoritative terms used.

An example of the infamous "Error 12".
See the captions, heading the columns - "Name, Label, or Host field" and "Destination, Target, or Points To field"?
Here you see an example of the ambiguity - and why custom domain diagnoses, and this article, are so pedantic. I use Dig log syntax, to describe necessary settings. Dig logs are registrar agnostic.
The language and syntax, and the screen prints, used in these examples, may help you - or it may confuse you. If the latter, my apologies. The confusion is part of the challenge. You may need to document your domain, providing similar detail.
Many registrars change their zone editors, periodically. Mine seems to change theirs, at least yearly. You should learn how to use the zone editor - not merely where to click and what to type - if you are going to own and maintain a domain, for any amount of time.
This article provides examples of what you might see.
- In the zone editor, provided by this registrar.
- In the zone editor, this month.
Start by asking your registrar for their zone editor instructions. If you ask for help later, in Blogger Help Forum: Get Help with an Issue, providing a link to the instructions would be a huge help.
When you buy your domain, you can use the Blogger instructions as a general guide. But get detailed instructions, from the registrar, too.
What comes last?
If you just made address changes based on my advice above, allow for the DNS Latency period. Double the DNS value - and wait for that time period, to give your domain changes a chance to be established worldwide.
If the domain verification DNS address was just added, try to publish the blog to the "www" address. And don't forget to redirect the domain root, to the "www" host!
If the blog is now successfully published to the domain, start migration activity.
If you continue to have a problem, read my troubleshooting guide, Troubleshooting Your Custom Domain Problems.
Comments
from http://nitrobotik.blogspot.co.id/ and http://nitbot.com/
Thanks for the comment.
I'm not sure why you're here, either. If you have a problem with popup ads though, you need to remove Gadget1 "Real-time Earth and Moon phase" from your blog. That's a known problem.
Please, if you need help, post in Blogger Help Forum: Get Help with an Issue - and we'll do our best to get you sorted. But start by removing Gadget1.